Sunday, November 3, 2019

There's Not Mush-Room Left

What do you like to do for “you time”? For me, it’s always been cooking, enjoying a good meal, or spending time with loved ones… and maybe being a burrito and not doing anything.

This weekend, my me time consisted of all of the above! I was fortunate that Fat Moon Mushrooms had a surplus of Oyster, Shiitake, and Piopinno mushrooms and had a field day cooking them. I ordered three pounds and got this lovely mix. Not going to lie, opening this box was like opening a present on Christmas Day.


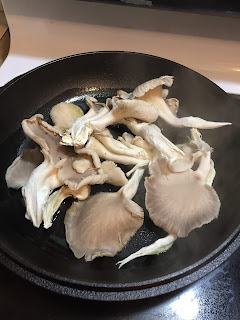
Cooking them was even better. I fried the Oyster and Piopinno Mushrooms in Extra Virgin Olive Oil with garlic and salt and finished it with some butter. Nothing crazy, but oh so yummy. I mean, look how FRESH these mushrooms are!


I wanted to keep the preparation for the Oyster and Piopinno simple. Extra Virgin Olive Oil, garlic, salt, and butter to finish them off. Trust me, your life will be happy with this recipe in your back pocket.


For the Shiitake mushrooms, I was inspired by this recipe.

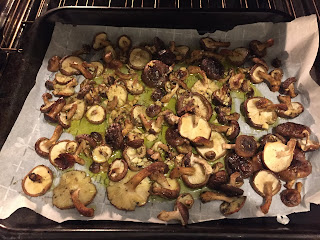
Usually, I’m not the biggest fan of Shiitake, but roasting them makes them UNREAL! All the Shiitake Mushrooms need are some oil, rice rice wine vinegar, salt, and some earthy seasonings, like Thyme and Sage.


Oyster and Piopinno Mushrooms

Ingredients:
1 lbs of each oyster and Piopinno mushrooms
4 tbsp of extra virgin olive oil
½ tsp salt
4 cloves of garlic, chopped
1 tbsp unsalted butter
1 green onion, thinly sliced

Directions:
  1. Heat a cast iron dutch oven over medium heat
  2. Add the oil and once it is shimmering, add the mushrooms in a single layer
  3. Leave the mushrooms alone for 3-5 minutes
  4. Once browned on one side, carefully flip them over and let sit for another 3-5 minutes
  5. Add garlic, salt, and butter and give it a good mix
  6. Once browned, enjoy! 


Shiitake Mushrooms
Ingredients:
4 tablespoons extra virgin olive oil
1 tablespoon rice wine vinegar
1/2 teaspoon fine salt
1 teaspoon dried thyme
1/2 tsp ground sage
1 lb. fresh shiitake mushrooms, rinsed and dried

Directions:
  • Preheat oven to 400 degrees
  • Combine all of the ingredients, except the mushrooms, in a big bowl
  • Toss the mushrooms in and coat evenly with the sauce
  • Line a pan with parchment paper and transfer the mushrooms in a single layer
  • Roast the mushrooms for 25 minutes 
  • ENJOY!


Sunday, October 13, 2019

Kettle Corn Popcorn

Per the request from my dear friend, I made some kettle corn popcorn! And what a perfect fall treat. All you need is some canola oil, popcorn kernels, finely ground salt, and sugar.

Add ¼ c of canola oil to a large pot with three kernels. Once those have popped, add in 1/4 c of sugar, ½ c of kernels and a tsp of finely ground salt and mix well. If you don’t stir the pot immediately, the sugar will clump up like mine did.

 
 Continue to stir the pot while the kernels pop until the popping slows down to 1-2 pops per second, otherwise the sugar will burn. ENJOY (be aware, it's pretty addicting)!


Thursday, October 3, 2019

Kombucha pt 1: Making the SCOBY

What the heck is Kombucha? What is a SCOBY?! Kombucha a fermented tea drink that has been popping up in your local coffee shop or local grocery store. Typically, it’s made from fermented black tea sweetened with white sugar. To some, the taste can be a bit unusual, but what I really like about it is that you can have a flavorful bubbly beverage that you can make all your own! 

So how do you make this probiotic filled soft drink? Well, you need to start with a SCOBY, aka Symbiotic Culture Of Bacteria and Yeast. You can get one in a few different ways, but here, I’ll talk about making your own. 

First, you need to purchase kombucha that is unflavored, raw, and unfiltered. The reason for the unflavored part is so that the flavor additives in the other beverages may prevent the growth of the good bacteria and yeast you want to cultivate. It also needs to be unfiltered and raw for the same reason. 

Now, what we’ll need to do next is make the sweet tea. For a half gallon batch, steep 1 tbsp (4 tea bags) of black tea in 7 cups of hot water and add in ½ cup of white sugar. Give it a good stir. Let the tea steep for about 10-15 minutes and remove the tea. Make sure the temperature is warm enough to sip on comfortably. As you can see, I was being a bit impatient and made and ice bath to speed up the cooling process. 


Next, add in 1 cup of the Kombucha. If there’s a weird jellyfish looking thing, that’s a small SCOBY! Definitely add it in. If not, no biggie, it’s not needed for this process to work. As you can see in my photo, there’s a bit of the mother culture at the top. 


Now, cover the jar with a coffee filter and use a rubber band to keep it in place. Store in a dark place where it won’t be disturbed for 1-4 weeks. Feel free to take a peek, but do not disturb the jar. After a week or so, you’ll see tiny bubbles forming at the top of the jar, like you can see below. I can see a lot of carbonation happening, which is the yeast/bacteria eating the sugar as well as smell a lightly sweet yet tart fragrance.  


As more and more tiny bubbles form, you’ll see a thin film developing at the top of the jar. As that film gets thicker, that’s a SCOBY! Here’s what my Scoby looks like after four months. The speckled black dots are the tea leaves.


Once it hits about ¼ inch thick, you have a viable SCOBY to use for making Kombucha :) In later blogs, I’ll write about using flavored teas, flavoring your kombucha with fruit, and even making Jun Tea (fermented green tea sweetened with honey). 

If you have any questions about how your SCOBY is doing, here are some great resources:

Monday, August 12, 2019

Browned Butter Popcorn

Have you ever tried making homemade popcorn and once you top it with melted butter, it becomes a soggy mass? If not, take my word for it, it’s not great. Here’s some tips for awesome browned butter popcorn!

So what makes my popcorn different? The reason for the popcorn getting soggy is that melted butter has a lot of water in it, which gets absorbed by the popcorn. To fix this unappetizing issue, I added browned butter and finely ground salt to the popcorn. Browned butter is butter that has been melted and cooked a bit. When you continue cooking the butter past its melting point, the milk solids start to foam and toast and become browned bits in the clarified butter. Your kitchen should smell like a nutty, toasted pie crust. Browned butter solidifies well in the fridge and can be used in many sweet or savory recipes! 


 I also grind my salt with a mortar and pestle before adding it to the popcorn because it does a better job at sticking to the kernels.


I know it sounds like a lot of effort for a snack, but trust me, your patience will be rewarded!

To make the popcorn, I add 1 tablespoon of coconut oil to the pot and add three popcorn kernels. This method lets me know when the pot it hot enough to handle the kernels.

Once the three kernels have popped, add about a fourth of a cup to a half cup of kernels. Cover the pot to trap in the steam. Give the pot a little shake to get the kernels covered in oil.


Every minute or so, give the pot a shake to prevent some of the popcorn from burning. Once the popping slows to about 1 per 5 seconds, I remove the pot from the heat. To season the popcorn, I put about half in a big bowl and add some of the browned butter to it. I then sprinkle it with some salt and mix to spread the seasonings. Repeat with the second half. ENJOY with a good horror movie… or whatever type of movie that sparks your fancy.


Ingredients:
1 tablespoon of coconut oil
¼ to ½ cup of kernels
1 tablespoon of browned butter
1 teaspoon of salt, finely ground

Directions:

  1. Add coconut oil and three kernels to a pot on medium heat
  2. Once the kernels have popped, add the rest of the kernels and cover
  3. Every minute of so, give the pot a little shake
  4. Once the popping has slowed, remove from heat
  5. Add about half of the popcorn into a big bowl, dress with half of the browned butter and salt. Mix to combine.
  6. Repeat step 5 with the second half of the popcorn 


Thursday, June 27, 2019

Trying Locally Sourced Flour!

In my pursuit to buy local flour, I did some research on what local flour mills I could find. Low and behold, Four Star Farms popped up on my search. This farm has been around for over 28 years and has a unique business where they mill to order and package orders once a week.

They share, while not efficient, the process they follow is one way to reduce food waste and ensure that their customers get the freshest product possible. Check them out, here! I received the flour three business days after they close out on orders Monday at 1PM.

I immediately went to bake with the fresh 20lbs of flour I ordered. Yes, I did buy 20 lbs, 2 orders of 5lb bags of bolted (sifted) bread flour and the same amount for pastry flour. As part of an experiment, I thought I would compare Four Star Farms’ flour with King Arthur’s Flour (KAF), which I had on hand. Just by smelling the two flours, the Four Star Farm’s product smelled sweeter and had a stronger flour scent.

Since I had an event to go to this weekend, I decided to bake brownies and do a side by side comparison.


The recipe I followed was one on Allrecipes that you can find here.

First I melted ½ cup of butter in the microwave and mixed in 1/2c of sugar, 2 eggs, and 1 tsp of vanilla. I only add about half of the sugar for a more dark chocolate brownie. Once that was combined, I added ⅓ c of unsweetened cocoa powder, 1/2c of flour, ¼ tsp of salt, and ¼ tsp of baking powder.
The batter on the left is made with KAF, the batter on the right is made with flour from Four Star Farms

I preheated the oven to 350 degrees and poured the brownie mix into two different pans. The FSF Flour went into the 8x8 pan and the KAF went into the 9x9. Unfortunately, I did not have the same pan size, so this could lead to differences in baking times.


I baked the KAF brownies for about 20 minutes and baked the FSF brownies for 25. Both looked the same out of the oven.

Let’s take a peek in the brownies to see any differences.


Both look pretty cakey, which could mean I overmixed the batters. The 9x9 KAF batter definitely spread too thin, which makes sense. The 8x8 Four Star Farms brownies were thicker but still looked similar. Now onto the TASTE TEST.


The brownies made with Four Star Farms were much more chocolatey, even though I added the same amount of cocoa powder in each batch. While I think it is not truly a side by side comparison due to the different sizes in pans, I ended up with two batches of awesome brownies. I hope this inspires you to do your own taste test with locally sourced ingredients!

Ingredients:
1/2c butter
1/2c sugar
2 eggs
1 tsp vanilla extract
1/3c unsweetened cocoa powder
1/2c flour
¼ tsp salt
¼ tsp baking powder

Instructions:
Preheat oven to 350 degrees Fahrenheit and grease pan with butter
 In a microwaveable bowl, melt 1/2 cup butter. Stir in sugar, eggs, and 1 teaspoon vanilla.
Lightly beat in 1/3 cup cocoa, 1/2 cup flour, salt, and baking powder. Spread batter into prepared pan.
Bake in preheated oven for 20 to 25 minutes. Do not overcook.

Wednesday, June 19, 2019

Chicken Parm


Chicken parm, what a classic Italian comfort food that will NEVER leave you hungry after a plate of it. That’s my kind of meal. To make it can seem a little intimidating, but if you organize the ingredients in order, you will set yourself up for success (and maybe even in life). 


I sliced the chicken and seasoned it with salt and pepper on both sides.
20161222_153225.jpg


I laid out three shallow bowls. In the first, I put some all purpose flour. In the second, I scrambled two eggs. And in the last bowl, I had a mixture of both panko breadcrumbs and Parmesan cheese. I also placed a plate at the end of this line up and covered a baking sheet with foil.
20161222_153227.jpg


Meanwhile, I preheated a pan over medium high heat and preheated the oven to 400 degrees F.

Take a piece of chicken, coat it on both sides with the flour. Dust off any excess flour. Dunk the chicken into the egg, and then put it in the third bowl of panko and cheese. Cover the chicken on both sides and then place it on a plate to allow the cheese and crumbs to adhere to the chicken. Repeat until all the chicken is coated.

In the pan, toss in some smashed garlic and oil. This will allow for a garlicky oil to pan fry the chicken in. Place 2-3 pieces of chicken in the pan and brown on both sides, about 2 minutes per side. Do NOT overcrowd the pan or the chicken will not brown well. Once done, place on the baking sheet. Repeat until all the chicken has been pan fried. As you will notice, the Parmesan cheese melts beautifully while the panko crisps up and makes a cheesy toasty coating on the chicken.
20161222_153233.jpg

Bake in the oven for 15-20 minutes, or until the chicken is cooked all the way through.

Prepare rotini, or your pasta of choice, and use your favorite red sauce to coat the pasta. Top the pasta with chicken and mozzarella cheese and ENJOY!

Ingredients:
3 lbs of chicken breast, sliced
2 cups of panko bread crumbs
½ c of Parmesan cheese
2 eggs, beaten
1 cup all purpose flour
3 garlic cloves, smashed
Mozzarella cheese
Olive oil
Your favorite pasta and red sauce

Directions:

  1. Preheat oven to 400 degrees F
  2. Season the sliced chicken with salt and pepper on both sides
  3. Coat the chicken in the flour, remove any excess flour
  4. Dip the chicken in the egg on both sides
  5. Coat the chicken evenly with the panko breadcrumbs and Parmesan cheese mixture. Place on a plate to let the coating adhere to the chicken.
  6. Repeat steps 2-4 until all the chicken is coated.
  7. Preheat a pan to medium high heat
  8. Toss in olive oil and smashed garlic
  9. Brown the chicken on both sides, roughly 2-3 minutes on each side. Place on a baking sheet
  10. Bake in the oven for 15-20 minutes, or until cooked all the way through
  11. Serve with your favorite pasta and red sauce!


Sunday, January 20, 2019

I Haba Obsession with Hot Sauce

Have you ever heard of or tried fermented hot sauce? My first exposure to this sauce was when I went to Omi’s Coffee Shop in Portland, ME. I ordered the breakfast sandwich and saw that I could add this bright red sauce on the side (Resurgam’s Back to Roots hot sauce). I tried it and fell in love with the hot, flavorful, and complex condiment.

Instead of ordering it, I wanted to try my hand at fermenting hot sauces. I purchased habanero peppers and Scorch Bonnets, about a pound of each. I then cut them in half and placed them in a mason jar. I filled the jar with a salt brine mixture (for every 1c of water, add 1 tsp of salt), added garlic, topped it with fermentation weights, and let the peppers ferment for over a month. I had enough peppers to make a smaller jar with half habaneros and half Scorch Bonnets! I’m sure it’ll be an interesting flavor combination. 

As an aside, fermentation weights help to keep the peppers submerged in the brine, which decreases the chance of bad bacteria growing. Also, as the peppers ferment, the healthy bacteria on the peppers will start to multiply and produce carbonation in the mason jars. I would recommend “burping” your jars, or opening the jars, once a day to let the gas out. If any water comes rushing out, that’s okay! It means your peppers are happily fermenting. Just be sure to wash your hands well, you wouldn’t want any hot peppers in your eye! 


Now that a month had passed, I experimented with add-ins to help mellow out the heat and add flavor. For the habanero sauce, I added Jack fruit! Never heard of Jack fruit before? You can find it in the International foods section in the market. I picked this fruit because I wanted to keep the bright orange / yellow color and add a bit of sweetness, but you can experiment with other fruit or veggies! 

PSA: When I tried just the habanero peppers blended, I had to lay down on the floor and contemplate my life choices. It was so spicy that I felt the burn all the way in my stomach. So be careful!!


If you use the Jack fruit, I would highly recommend one whole can with a splash of syrup with half of the habaneros (and no garlic). I used a small blender to combine and viola, fermented hot sauce! The flavor will get better as it sits in the fridge. 


Ingredients: 
1 lb of your favorite pepper
Salt brine (1 tsp salt for every 1c of water), enough to fill the mason jar, leaving an inch of space
6 cloves of garlic
1 can of jack fruit in simple syrup 

Directions:
  1. Remove the stem from the pepper and cut in half. Place in the mason jar until full
  2. Combine 2 c of water and 2 tsp of salt and add to mason jar, leaving an inch of space
  3. Smash garlic and add to the jar and stir peppers around.
  4. Add fermentation weight, close the jar, and let ferment for at least two weeks
  5. In a blender, put the whole can of jack fruit (no syrup), half of the habanero peppers, drained, and blend until well combined. Feel free to adjust the taste by adding more/less fruit, or some of the simple syrup.
  6. Put in a mason jar to store and keep in the fridge! Enjoy!